Showing posts with label couch slipcovers. Show all posts

June 13, 2011

slipcover adventures.....the final reveal!


It's finally finished!
Pay no attention to the pillows. They are just random ones gathered from other rooms of the house. I am still searching for the perfect pillow fabric.


I have to say I am really happy with how this slipcover turned out. I have learned so much in the last few months about sewing, cutting, piping and hemming. It's been all trial and error and experimentation, but I've really enjoyed the process. I know I have a lot more to learn. This is only my second slipcover, so I can only imagine that I will learn more and more as I continue to work on new projects.


If you are a beginner sewer and nervous about slipcovering, don't be! You will make mistakes, but they can all be fixed. Your seam ripper might become your best friend, but that's OK. ;)

Here's the back. My favorite part of my chair slipcover was the bows in the back so I decided to do that again with the couch. LOVE!


I feel like I should remind you what this ugly ol' thing looked like before...


If you missed any of my slipcover posts you can find them here:


Thanks for following along for my slipcover adventures! I hope you learned something along the way and I hope you try your very own slipcover soon! If you do, I would love to see your results or help you if you have questions!


Linking up with Shuanna


and Marian
 Furniture Feature Fridays

June 10, 2011

more slipcover adventures (and a whole bunch of pictures)

Sorry it's been several days since I gave you an update on the slipcover. I've been spending every second of my free time trying to finish it up and just haven't had  time to edit and upload the pictures.

But here, we go. The last post covered the arms and the seat. All that is left for the body of my slipcover is the front of the arms and the skirt.

Since I decided to pipe around my arm fronts, the first step is making your piping. Super easy. You just need cording and a 2" wide strip of your fabric. The length depends on how much piping you will need. I ended up using about 20 yards for this couch (including arm fronts, skirt and cushions). Just place your cording in the middle of your strip of fabric and fold the two ends of your fabric together then run it through the machine. It's a little boring to sew a straight line for 20 yards, but it's easy, mindless work.


Once you have your piping, then you can start the arm fronts. As usual, make sure your fabric is inside out (wrong side facing the furniture) and start pinning. If you use piping, your piping should go in between your two pieces of fabric. Think of it as making a sandwich. And making sure the raw edge of your piping is going in the same direction as the raw edges of your other pieces. Pin along the curves and as you get to the bottom of your arm you will transition to pinning the arm front to the seat of your couch/chair (instead of to the body of the arm).
If this all sounds confusing, I apologize. It's not exactly easy to type these instructions. If you are a visual person, like me, check out Miss Mustard Seeds video series. It makes so much more sense when you can watch someone doing it.


And here is the best tip I will probably ever give you. It will save you countless hours of frustration and seam ripping. Buy yourself a piping foot for your machine!! I didn't even know they existed when I slipcovered my chair. I used my zipper foot because that's what was recommended to me. It was a horribly, frustrating experience that resulted in a lot of seam ripping and some piped arms that still bug me every time I look at them. Miss Mustard Seed uses her zipper foot and it seems to work for her because her piping looks beautiful, but I am not nearly as talented and for me the zipper foot was not working. So if you are more of a beginner in sewing, spend the $12 and purchase the piping foot. I would have paid 5x that for the convenience it brought me!


Here is the finished result with the piped arms. They aren't perfect. But I am happy with them and they are a million times better than the piped arms I did on my first slipcover!


Here's a close up. Ignore the wrinkles. I don't believe in ironing. I figure the wrinkles will eventually fall out. ;)


So, onto the skirt. This was my first skirt attempt. I did not add a skirt when I slipcovered my chair. And I decided I wanted to add pleats on the corners for this one (never done those either) so it was all a big experiment for me, but that's half the fun, right?!
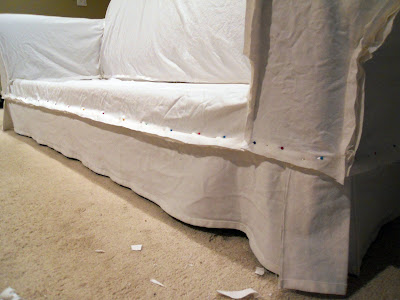
The picture below shows the skirt all pinned (and of course everything is inside out).


It's hard to see the pleat on the corner because it's inside out, but if you look closely you can see the little rectangle on the corner. I pinned and sewed the pleats first before I pinned the whole skirt.


Here's a close up of the finished skirt and one of the corner pleats. Again, nothing perfect here. But I like it. Who wants perfect anyways? ;)


I don't get all precise about measuring the length of the skirt. I hem my edge first and then as I'm pinning the skirt I just eyeball the length at the bottom and pin accordingly. Again, perfection is not my goal.


If you want perfection, I think reupholstering is the way to go. Slipcovers are never going to be perfectly fitted and 100% precise. For me, that's part of the appeal.


So the  body of my slipcover is done! All I have left is the 2 cushions.


I finished one cushion last night and hopefully the other will be done by tonight. So the final reveal is coming soon! Stay tuned.....

June 02, 2011

slowly, but surely

Projects take a little bit longer when you have a toddler at home. If I could just have one uninterrupted day I could finish this slipcover pretty quickly, but with a toddler it's more like one hour here and one hour there, wherever I can fit it in during naptimes and after he goes to bed in the evenings.
So I appreciate your patience, while I finish this project a little bit at a time.

So after I finally finished cutting all my pieces and washing everything*, I started working on the back of the slip. For some reason, I didn't take a picture of the entire back piece, but here are the details for those of you who want to know. I cut two pieces for my back and they overlap by about 1-1/2 inches in the middle. I hemmed the sides that overlap so they have a finished edge and I plan on sewing on ribbon to each piece so I can tie my slipcover in the back. This is what I did on my chair and it turned out to be my favorite part!

*just a note on cutting pieces and then washing. My small pieces did fine, but my largest pieces had A LOT of shrinkage. The seat had so much shrinkage that it was no longer big enough no matter how I tried to make it work. So I just want to warn you. If you try this route, you should make your cuts generously!

OK, moving on. After the back pieces were ready, it's time to sew the back to the "back rest". I don't really know what the correct term is for this part, but it's the front side of the back (the place where your back rests) so that is what I will call it!


Straight lines like this are easy. You just get your pieces where you want them and then pin along the line of the couch.

{Always make sure you are working with your fabric inside out, meaning the "right" side of your fabric is facing the couch when you are pinning.}


Once you're all pinned, it's time to sew! This is the most fabric I have ever worked with and it's a little difficult to manover it all around while sewing. I do really like this duck canvas though. It's a great weight and doesn't bunch up while your sewing like some lighter weight fabrics tend to do.


Next was the sides of the back rest. Originally my plan was to have the back rest all one pieces, extending all the way around to these sides. But I played with my fabric for a long time and could not get it to work. It was going to be too much fabric bunched around those corners. So I chose to use seperate pieces for the sides.


You can see below how I pinned the two pieces  together. If you are a beginner sewer like me, curves are the most difficult. So take your time and stop every few inches to make sure your fabric isn't bunching up underneath your presser foot. Also when you are pinning it helps to use a lot of pins and pin close together. This will help you follow the curves better. I always use my blue fabric marker for the curves too. I just draw a little arch and it help me know exactly where to sew when I get to the curved part.

Below is one side after I finished sewing. I'm pretty happy with it and I am actually glad now that I went with a seperate piece for the side. Of course, I repeated these steps for the other side as well.


Next is sewing on the arms. I'll be back with progress pics and details as soon as I finish that part!

Thanks for following along on my slipcovering adventure!

May 30, 2011

let the slipcovering begin!

I've never worked with a piece of fabric this large before. It took me forever just to unwrap it from the bolt!


So rule number one is always wash your fabric first. You wouldn't want your slipcover skrinking once you had already sewed it together! When I slipcovered my chair I just estimated and cut my 10 yards of fabric into several big chunks that would fit in my washing machine. Afterwards, I wasn't  really happy with the result. I felt like it was an inefficient use of my fabric and I had a lot of waste.
So this time I have decided to make all my cuts first (leaving room for a little shrinkage, of course) and then wash it.
First I cut about and 1 to 1-1/2 inches of the entire length of my fabric. This strip will be for my piping.
I really didn't want to measure and mark 1-1/2" for the whole 15 yard strip. So I just "eyeballed" it as I went. You can see in the picture below that every couple of feet I would hold up the beginning of my fabric strip to the piece I was cutting to make sure I was still cutting the right width.


Have you ever tried to take a picture with your left hand while you are cutting with scissors in your right hand? It's not as easy as it looks.


Then I did the same for my skirt, except it was about an 8" wide strip. I plan on cutting the rest of my pieces with pinking shears (I just bought a pair yesterday). That should help cut down on the fraying when I wash my pieces.

All this cutting got me excited for this project so I decided to go ahead and pin my skirt on the couch just to get an idea of how it was going to look.


I'm going to do a box pleat on each corner of my skirt. I am so excited to see how this comes together.


It's going to be sooo much better than the current, ugly, brownish couch!

Hope you all are having a wonderful Memorial Day!
More slipcover progress coming soon.....