June 28, 2011

a little bit of random for good life wednesday

This post is a random assortment of the things that make me happy......

First and most important, the little man. His favorite summer past time is playing in the hose. He would stay out there all day if I let him. I love watching him explore. He is the happiest when he is outside, roaming free and making lots of messes!


Second, is this little fabric envelope I made. The tutorial came from one of my favorites, Emily of Jones Design Co.


My sister's birthday is this month. My parents gave her a Kindle, so I decided to give her an Amazon gift card so she could buy herself some books. Gift cards aren't all that exciting to give, but the little fabric envelope makes it more fun!


I have no idea why I didn't take any pictures during the process of making my envelope. It never occurred to me that I would put it on the blog. It was a fun, easy project that I highly recommend.
Oh and P.S. I changed mine up a bit and used a different flower than Emily did for her envelope. I used her gathered flower tutorial for my flower and I love the way it turned out. I like it so much that I think I am going to make another one of these flowers to put on a headband.


And last but not least, I love getting mail! I look forward to checking the mailbox everyday. And packages?? Oh packages are even more exciting! So today when this showed up at my door it felt like Christmas!
In case you're curious, among the packages were 1 - the amazon gift card for  my sister.  2 - a few rabit skins toddler shirts I ordered for the little man. 3 - another amazon package of items for our trip this week (mainly DVDs to keep a certain someone happy on the 9 hour car trip). 4 - the best of all....my fabric I ordered from Calico Corners to make pillows for my recently slipcovered couch!


I hope you are enjoying your Wednesday! Sarah is having problems with her server so I'm not sure if she will be hosting her "good life wednesday" party or not, but I'm participating anyway. :)

We leave for Florida on Thursday so I may or may not be around the rest of the week. I hope everyone has a great 4th of July!!

June 26, 2011

leg dilemma - i need your opinion!

Do you remember my first slipcover I made? Remember those cute little wooden legs I found when I ripped the original old skirt off the chair?


Well I still love the legs, but the color was starting to bother me. I felt like the brown was too dark and heavy for the light paisley print. I found myself staring at them all the time wondering if I should paint them or possibly add a longer skirt to my chair or maybe just leave them alone?


So a few nights ago I grabbed my chalk paint and went to painting to see if I could improve them. But I'm still not sure. {Sorry about the pictures. It was night time so I had to use my flash. The white isn't quite that bright in real life}


So I need your help! What do you  think? Do you like the white? Should I sand the white off and go back to dark? Or neither? Is it maybe that there is too much leg showing and I need to add more skirt to my slipcover? I would love to know your thoughts!!

June 21, 2011

a little bookshelf and a chalk paint review

If you haven't heard the buzz about chalk paint by now you have either been living under a rock the last couple of months or you just don't read enough design blogs. ;)


Either way you should check this stuff out! No sanding, no priming, sticks to any surface, leaves an amazing matte-looking finish. Perfect for vintage-y, french inspired pieces.

I've been dying to try out my chalk paint since the minute I bought it 2 weeks ago. Unfortunately I didn't have any vintage, french inspired pieces lying around that needed paint. I did, however, have an Expedit bookshelf from Ikea in black-brown (their creative name for the color, not mine).

I bought it several years ago, when I was in a dark furniture phase and the husband needed some more book storage (history nerd). What was I thinking?! (About buying this bookshelf, not marrying a history nerd. He's pretty great, despite his history nerdiness).

via Ikea


Anyway, its fit all  the specifications for a chalk paint makeover. Laminate surface that I am too lazy to prime or sand, dark color needing an update, etc, etc. So I went with it.

And here's what I got.....


 I wish I would have taken some pictures during the painting process, but it was night time and dark and they probably wouldn't have turned out very well.


Overall, I really like the chalk paint. They are definitely right. No sanding or priming required. This paint stuck amazingly well to this cheap laminate with no problem at all. Very impressive. It is a little different to work with. A little thick as far as paint goes, but once I started dipping my brush in a tiny bit of water that helped a lot. It dries to a beautiful matte finish just like they say. They recommend that you wax chalk paint to protect the finish (instead of using poly). I haven't waxed it yet, but I'm excited to try.


I did a little re-decorating after I painted it to try and make it less "book-heavy." (I wish I had a before picture - it was ALL books and hideous! I would love to stack some of my vases or glass bowls in  there to break up the books, but putting anything breakable at that level is not a good idea when you have a wild toddler running around.


The only non-breakables I could find to use were a few wooden bowls. I filled one with some various spools of twine and another with some linen napkins. I couldn't even finish snapping the pictures before he was grabbing twine and napkins!
See what I mean?!


Have you chalk painted anything lately? I would love to hear your thoughts and/or suggestions!


Linking up with Sarah for Good Life Wednesdays!

June 20, 2011

summer gardening

I love summer and every year I look forward to filling our garden with plants of tomatoes, cucumbers, peppers, eggplants, blueberries and more! There is really nothing better than growing your own food. It's one of the coolest things to watch a little seed grow into a bush and then have blooms that grow into delicious fruits and vegetables. And there is nothing like fresh produce picked right from the vine. Nothing from the grocery store even comes close in taste.

So here are a few things I'm growing right now.....

Tomatoes

More tomatoes (I think we have 6 different varieties this year)

Cucumber blooms with little baby cucumbers

Growing cucumber

Blueberries

Eggplant blooms

Have you ever grown eggplant?

This is the first year I have tried and I am in love with their blooms

So beautiful.

I am anxiously awaiting harvest day. Hopefully it's coming soon!

June 14, 2011

coffee bags

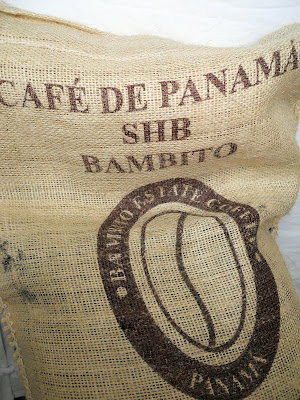
Latley, I've been obsessed with grain sacks, coffee sacks, burlap sacks and the like. Saturday we took the weekly trip to our favorite local coffee shop, Primavera. They roast all their own coffee right in their store.


There are always stacks of coffee bags, full of beans ready to be roasted. But this was the first trip that I saw empty bags. They were just sitting in a stack on the shelf.


  I asked Brett (the owner) how much he was selling them for. When he told me they were free, it took everything I had not to jump up and down in excitement. So I dug through the stack and picked this one.


My first thought was to make a pillow, but the fabric is a little rough and sheds a lot. So now I am thinking I might turn it into some wall art.


I'll keep you posted!
Oh, and if you're in the Birmingham area check out Primavera Coffee Roasters. You'll never go back to charbucks again.
 
 
Linking up with A Beach Cottage

June 13, 2011

slipcover adventures.....the final reveal!


It's finally finished!
Pay no attention to the pillows. They are just random ones gathered from other rooms of the house. I am still searching for the perfect pillow fabric.


I have to say I am really happy with how this slipcover turned out. I have learned so much in the last few months about sewing, cutting, piping and hemming. It's been all trial and error and experimentation, but I've really enjoyed the process. I know I have a lot more to learn. This is only my second slipcover, so I can only imagine that I will learn more and more as I continue to work on new projects.


If you are a beginner sewer and nervous about slipcovering, don't be! You will make mistakes, but they can all be fixed. Your seam ripper might become your best friend, but that's OK. ;)

Here's the back. My favorite part of my chair slipcover was the bows in the back so I decided to do that again with the couch. LOVE!


I feel like I should remind you what this ugly ol' thing looked like before...


If you missed any of my slipcover posts you can find them here:


Thanks for following along for my slipcover adventures! I hope you learned something along the way and I hope you try your very own slipcover soon! If you do, I would love to see your results or help you if you have questions!


Linking up with Shuanna


and Marian
 Furniture Feature Fridays

June 12, 2011

The last step....covering the cushions

I feel I would be depriving ya'll if I didn't let you know the whole truth.....that right now while I sit and type this post I am enjoying the most delicious watermelon mojito. There I said it. Now we can move on to how I slipcovered my cushions. Oh and if you would like to enjoy a watermelon mojito too you can find the recipe here.

Moving on, cushions are a lot like pillows. If you've ever made a pillow cover you know they are pretty simple. If you've never made a pillow cover, you may want to start with that before you tackle a slipcover. :)

I chose to do a "pillowcase" style cover for my cushions - meaning there is an opening on one end. I secured the opening with ties. There are a million ways to secure pillow or cushion covers. On my last slipcover I did an envelope fold for the cushion. It was a pain to stuff the cushion in and out of the envelope opening, so I decided against that for my couch because these cushions are huge.

For my cushion, I just laid the cushion on top of my fabric and cut out two rectangles, giving myself about 2-3 inches extra all the way around. Then I cut one long strip of fabric for that middle piece of the cushion that holds the top cushion fabric to the bottom cushion fabric. Because I will have an opening on one side where my fabric doesn't meet, I hemmed those edges. (The pictures below doesn't show it well, but the right side is the side that will be open. You might be able to see my hemmed edges). So with all the pieces inside out, I pinned my top panel to the side piece, with my piping sandwiched in the middle. Once I sewed the top piece, I did the same thing with the bottom pieces. Make sure you pin tightly. There is nothing worse than having a big, lose cushion cover. You want it to fit nice and smooth.


I had a lot of trouble with the cushions on my chair. Mainly because I was piping without a piping foot and because there were a lot of small corners to go around. But this cushion came out very well and I was so pleased. Everything was going great and I was trimming all my raw edges when this happened....


Yep, I cut a big fat hole right in the side of my cushion cover. I wanted to cry, but I thought I might wake the baby. So I didn't. The annoying part is that I did this same exact thing on my chair so I was being SO careful not to let it happen again! If this happens to you, Wonder Under is your friend. It's a fusible fabric interfacing that you iron on and then stitch over. It doesn't look pretty but it will secure the fabric so it doesn't tear worse when you wash it. Thankfully, mine was on the side of the cushion so it will never show unless someone inspects my cushions. If they do, I am claiming shark attack.

So here's how it looks after I added the ties. I just used 7/8" grosgrain ribbon. I stitched the edge of each ribbon piece to the inside of the cover. When the cushion is on the couch these face the back so no one ever sees them.


So that's all on cushions. They should be relatively simple, as long as you don't let any sharks near your fabric! :)

Tomorrow is the final reveal of my newly slipcovered couch! Make sure to stop by and check it out!

June 10, 2011

more slipcover adventures (and a whole bunch of pictures)

Sorry it's been several days since I gave you an update on the slipcover. I've been spending every second of my free time trying to finish it up and just haven't had  time to edit and upload the pictures.

But here, we go. The last post covered the arms and the seat. All that is left for the body of my slipcover is the front of the arms and the skirt.

Since I decided to pipe around my arm fronts, the first step is making your piping. Super easy. You just need cording and a 2" wide strip of your fabric. The length depends on how much piping you will need. I ended up using about 20 yards for this couch (including arm fronts, skirt and cushions). Just place your cording in the middle of your strip of fabric and fold the two ends of your fabric together then run it through the machine. It's a little boring to sew a straight line for 20 yards, but it's easy, mindless work.


Once you have your piping, then you can start the arm fronts. As usual, make sure your fabric is inside out (wrong side facing the furniture) and start pinning. If you use piping, your piping should go in between your two pieces of fabric. Think of it as making a sandwich. And making sure the raw edge of your piping is going in the same direction as the raw edges of your other pieces. Pin along the curves and as you get to the bottom of your arm you will transition to pinning the arm front to the seat of your couch/chair (instead of to the body of the arm).
If this all sounds confusing, I apologize. It's not exactly easy to type these instructions. If you are a visual person, like me, check out Miss Mustard Seeds video series. It makes so much more sense when you can watch someone doing it.


And here is the best tip I will probably ever give you. It will save you countless hours of frustration and seam ripping. Buy yourself a piping foot for your machine!! I didn't even know they existed when I slipcovered my chair. I used my zipper foot because that's what was recommended to me. It was a horribly, frustrating experience that resulted in a lot of seam ripping and some piped arms that still bug me every time I look at them. Miss Mustard Seed uses her zipper foot and it seems to work for her because her piping looks beautiful, but I am not nearly as talented and for me the zipper foot was not working. So if you are more of a beginner in sewing, spend the $12 and purchase the piping foot. I would have paid 5x that for the convenience it brought me!


Here is the finished result with the piped arms. They aren't perfect. But I am happy with them and they are a million times better than the piped arms I did on my first slipcover!


Here's a close up. Ignore the wrinkles. I don't believe in ironing. I figure the wrinkles will eventually fall out. ;)


So, onto the skirt. This was my first skirt attempt. I did not add a skirt when I slipcovered my chair. And I decided I wanted to add pleats on the corners for this one (never done those either) so it was all a big experiment for me, but that's half the fun, right?!
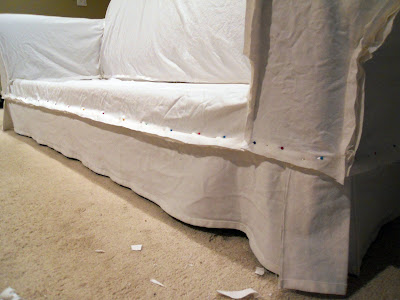
The picture below shows the skirt all pinned (and of course everything is inside out).


It's hard to see the pleat on the corner because it's inside out, but if you look closely you can see the little rectangle on the corner. I pinned and sewed the pleats first before I pinned the whole skirt.


Here's a close up of the finished skirt and one of the corner pleats. Again, nothing perfect here. But I like it. Who wants perfect anyways? ;)


I don't get all precise about measuring the length of the skirt. I hem my edge first and then as I'm pinning the skirt I just eyeball the length at the bottom and pin accordingly. Again, perfection is not my goal.


If you want perfection, I think reupholstering is the way to go. Slipcovers are never going to be perfectly fitted and 100% precise. For me, that's part of the appeal.


So the  body of my slipcover is done! All I have left is the 2 cushions.


I finished one cushion last night and hopefully the other will be done by tonight. So the final reveal is coming soon! Stay tuned.....